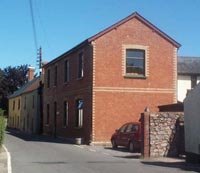
Monday, 5 November 2012

Back to Business

"What's the plan for this weekend?" I said to Janine a few weeks ago. "I dunno," came the reply. "Any reason we can't just decorate the lounge?" "Let's do it!"
We've lived with the horrible orange ceiling and the dark red walls in an already dark room, and more recently bare plaster, holes from removed plumbing etc. for far too long. There are still more important things to do, but this is the room we spend much of our time in so let's make it a nicer place to be.


 The first thing to do was to recruit some child labour, cheap and willing .


Good job Arne! Removing the paint has revealed the truly epic nature of the levels of stupidity some people are capable of. Someone in the past had crudely hacked out a channel (neither straight nor level) and sunk a live cable into the wall where anyone in the future could have decided to bang in a metal nail to hang a picture. That's how people get electrocuted in houses. Luckily they'd filled it so badly it was still clearly visible beneath the thick coat of paint.

Having reached the chimney breast and done much of the prepping, I couldn't bring myself to start painting knowing I intended to rebuild the fireplace into something altogether more pleasing and impressive than the hole in the wall with some unevenly exposed brickwork. Janine and Arne were going away for a few days during half term, so I had time to make a mess and get to work.


Step 1: Remove the rest of the plaster from around the fireplace. You may notice six bricks annoyingly protrude below the rest, and I decided they had to be cut. Hacking them off might well have brought half the house down.


 I made a tent to contain the dust, and borrowed Richard's stone cutter.


A gentle tap will now knock the bottoms off.

 The tent did it's job. It wasn't nice in there.

We have a large pile of original Victorian bricks saved from other building projects and dug up from the garden. After cleaning they were used with lime mortar (1 part lime, 1 part cement, 6 parts sand) to build a tower on either side of the fireplace.

Every few courses steel ties were added to keep them firmly anchored to the original wall.

Then a plywood former was made following the curve of the original arched top of the fireplace.

 Another couple of courses of bricks were laid which were cut at an angle to form a new arch.

 I laid the bricks loosely first and marked their positions on the former, before using mortar with more steel ties between the bricks.

 The next course of bricks required some neat cutting to follow the curve of the arch. One more on top of that and it's job done, nearly.

The moment of truth. The next day, I gently wiggled the former out and nothing fell down. Result. A large slab of oak should arrive this week to finish it off in style.  


Monday, 8 October 2012

A Word of Caution

I'm always surprised when people out there in the wide world (other than my friends) see this blog and decide to leave a comment. Brian Turner is a writer and researcher on health issues and asked if I'd be kind enough to post something related to this. Since Brian is living proof that there are people out there who read this blog sometimes, it certainly wouldn't do any harm. Here's Brian's piece, good advice for all. Thanks for taking the trouble Brian!


Avoiding the Dangers Involved in DIY Home Projects

Home renovation projects can be fun, save money and give you more control over how the project will look when you’re done. You don’t have to worry about professional installers doing it in the quickest way possible with low-cost materials to stay under bid. You can use your savings to replace the outdated wallpaper in the living room or on a higher grade of flooring for the kitchen. These types of renovations are exciting, but unless your home was built after 1990, there could also be dangers in trying to do some of these things yourself.

Where Black Mold and Asbestos Can Be Found

Many people don’t think about the potential for exposure to hidden black mold or asbestos that disturbing or replacing old structures and insulation can bring, but you should. Asbestos was in many patching compounds and popular textured paints before 1977. Vinyl floor tiles, the protective tiling and walls built around wood-stoves, and even the artificial ashes you use in gas fireplaces can contain asbestos. Mold might be inside your walls, underneath your carpets, behind the ceiling tiles, in the ductwork, or hidden behind that old, faded wallpaper or scratched paneling.

The Seriousness of the Situation

The potential for disturbing mold spores or asbestos fibers shouldn’t be taken lightly. These exposures can cause allergies, asthma attacks and other lung problems. In the case of asbestos, it can also cause mesothelioma cancer and other asbestos-related conditions because once the fibers get into your lungs, there is no way to get them back out. Mold and asbestos are both toxic and can seriously affect your lungs for the rest of your life. All do-it-yourself projects should be entered into with care.

What You Can Do About the Dangers

When it comes to mold, you can generally see its presence, but if you’re using a steamer to remove old wallpaper or ripping out flooring, you might disturb the spores before you see them. Unfortunately, according to the EPA, that doesn’t hold true for asbestos. You can’t tell if a substance contains asbestos simply by looking at it.

When doing your own remodeling, it’s always best to treat all reconstruction and demolition activities as potential mold and asbestos exposures. That’s what professional contractors do. They wear protective masks that cover their nose and mouth if they even think there might be a chance for exposure.

With both mold and asbestos, you want to keep your activities near any damaged materials to a minimum. You need to always be cautious. Don’t dust, sweep or vacuum in any area where the dust might have asbestos. In addition, avoid sanding, scraping or drilling holes in suspected materials as well. In fact, it’s best to just let a professional handle that type of renovation problem. While that defeats the purpose for doing things yourself, it’s a safer alternative.

The problem with asbestos isn’t an immediate problem. It actually takes years for many of the issues to develop, but the precautions you take today will help keep you healthy tomorrow.

Friday, 9 March 2012

Electricity

The panels have been up for a week and we've made 53 units of electricity.

Monday, 5 March 2012

Taking a Gamble

We here at Pleamore House have spent most of the last decade working to reduce the carbon footprint of what is an old Victorian farmhouse which was built with no regard for such things. The insulation we've installed has brought most of the house up to around the current standard of a new-build which has reduced our consumption of heating oil by at least a third. Further savings can be made by installing a modern condensing boiler but that is something for the future.

Having never really seriously considered the possibility of installing an array of photovoltaic solar panels due to the fact that we have no large areas of south facing roof, I recently reconsidered having seen several of our neighbors install panels and I did a bit of research on the potential of an east or west facing array. A reduction of 10-15% efficiency when compared to south facing would still make PV solar a very viable prospect, provided that it could be installed before March 3 which was the cut-off date for getting on the government sponsored 43p feed in tariff. We are huge fans of renewable energy and this suddenly seemed like a very exciting prospect.

We had a few quotes and only one company said they were able to install before March 3 so after a bit of a family conference, we signed a contract. From then on it was a very stressful saga of neanderthal scaffolders failing to complete their job on time, installers turning up without scaffolding to work on and things slipping ever and alarmingly closer to the deadline. Had we not submitted our paperwork to the electric company by 2 March, we would have been on a 21p tariff which would take twice as long to pay us back. There is still a chance this will happen as the government have asked the Supreme Court for permission to lodge a third appeal (they have lost 2 already) to allow them to retrospectively reduce the feed in tarrif (where domestic generators are paid 43p for every unit of electricity they produce) thus doubling the time this big investment takes to pay off for investors in renewable energy who had already bought in. If they get permission to appeal again and the win the appeal, then we're facing 12-15 years before our investment pays back the cost of the panels and installation, so that's the gamble we've taken. It is my belief that even if they are granted leave for another appeal, they will lose, and that this was more a cynical move to create uncertainty and dampen down deamand.


Thursday March 1st the scaffolding is up and the installation team is on site.


All but one of the panels are installed, waiting for the final panel to be driven down from Cardiff as one panel of the wrong type was accidentally supplied. The company issued our completion certificate and it was posted the day before the deadline.


This array of 21 PV panels produces up to 3.99kw of power. Anything over 4kw is classed as commercial production and we're not allowed to do that.


The PV panels produce direct current which this box called an inverter (situated in the loft) converts to alternating current suitable to use in the house and export back into the national grid. In addition to the 43p we'll (hopefully) get for each unit we generate, we also get 3p a unit for what we export back to the grid. Also, of course, we'll run the dishwasher and washing machine etc during the day so that we're using free electricity!

As I write this the time is 10.45 am, the sun has been in and out all day and we've already made 4.4 units of electricity today. Since it was switched on last Friday, we've made just over 20. Whatever happens with the tariff, it gives me great pleasure to reduce our consumption of non-renewable energy and we've surely made the house more salable and desirable in the long term.

Thursday, 1 March 2012

Over the Finish Line

Welcome back! I was busy at the drawing board from the end of September until mid-January but have since been working towards getting some more of the house finished. Feast your eyes...

Bathroom

The bath panel has now been fully grouted in and sealed with colour-enhancing tile sealant.


J9 likes to bathe in asses milk, which comes out of the left hand tap. I prefer the right one, which fills the bath with warm asparagus soup. Very good for the skin.


All neat and tidy with the skirting boards done, all the pipes hidden behind and now insulated with expanding foam. Hanging rail placed above the radiator.


Finally the sink, which stands next to the re-plastered and repainted enclosure for the hot water cylinder. All the fixtures are dead posh and expensive, except we bought them as an end of line ex-display at a fraction of their normal price.

Dressing Room

All we needed in here was the carpet and the gaps under the wardrobes (caused by the sloping floor) covered with some wooden moldings. Difficult to get a decent picture due to the restricted space but you get the idea.


Those of you who are on the ball and have very long memories will notice that we have changed our minds about tiling the floor as we envisaged here.

Airing Cupboard Passage

This small area has been painted, carpeted, architraved and skirting-boarded.


Sunday, 14 August 2011

What Happens When You go Away for 2 Weeks.....


You go off to Spain for a couple of weeks, spending much of your time open water swimming on the beautiful lake Negratin, and you come home.....


....to find your self buried under a mountain of beans.....


....and with a new addition to the family, Daisy.


Tuesday, 28 June 2011

A Milestone

Anyone who has seen this blog before may well recall that one of the major issues with this house has been low pressure on the hot water. We had to fit a noisy pump to the shower to achieve adequate flow. But now, Coleman Plumbing and Heating in Taunton are about to change our lives.

Unfortunately, this does involve some demolition in the bathroom to gain access to the hot water cylinder. I spent half of Saturday ripping out the stud walls Richard built around it.


Then yesterday, Stuart came to work and we drained all the water from the house including the central heating, before removing the old vented hot water cylinder.


This is the new stainless steel unvented, pressurized cylinder that will take its place.


Before installing the new cylinder, almost all of the old pipework was cut out and replaced. I particularly like this bit here with all the curves and angles.


It fits, just.


Thursday, 26 May 2011

Hole in the Wall

The wall before I started. It might look solid at first glance, but the cap is completely falling to pieces and once you start poking a bit, so is much of the rest of it.


Here's a prime example. A bit of poking and the next thing you know there's a hole big enough to conceal a gang of outlaws. Here I've dug out the bit between the wall and the slabs I laid last year and pummeled some hardcore down as I'm going to fill the gap with render and stones.


Even with Richard's cement mixer this is chuffig hard work, without it I think I'd be dead by now.
Thanks Rich.


The render is 1:1:6 cement: lime: sand which makes a lovely sticky render that you can flick into all the corners and it just stays there. Working with stones you get through an amazing amount of render filling all the gaps.

Tuesday, 24 May 2011

Before and After


This shows the difference in flow before and after the cold main was replaced. Fantastic. Of course now, having never solved our issues with the pressure on the hot, that looks even more pathetic by comparison. Plans are, appropriately, in the pipeline.

For now, back to the wall.


Sunday, 22 May 2011

The Big Reveal

After another major drill bit stickage which took several more hours to extract, this blue pipe which is connected via a copper pipe to the plastic pipe upstairs, which in turn is connected to the cold water system in the airing cupboard, was inserted into the hole that took so much time, sweat and destroyed masonary bits to create...


emerging into this trench just outside the house (after another half hour of me smashing a large steel spike into the hole to yet further enlarge it)...


...which was dug this morning by these men, thus explaining the road closure! Our cold water main has today been replaced, ending almost a decade for us of low water pressure. Finally, I think we have found a plumber who knows his business. The old main was partly lead, partly very corroded galvanized steel. And best of all, the council had to pay for all this.

Friday, 20 May 2011

Stuck


The hole needs to be at least 60cm deep, but Dan's drill bit got stuck at about 30cm and remained stuck for most of the day until after Dan had gone home, at which point I had a go at it and got it out in about 5 minutes. Dan is here now completing the hole, hopefully without further stuckages.

Thursday, 19 May 2011

The Plot Thickens

Today, Dan made a hole in the floor through the concrete in the corner of the lounge.


Yesterday, he had all the carpets up on the landing upstairs and put in a plastic pipe (as well as some copper ones). Yes, these two things are related, and may also be linked to the road closure scheduled for this Sunday. The first correct guess (from anyone who I haven't already told what's going on) as to what's happening will receive no prizes at all.


Wall


The wall at the back of the garden is falling down in places and needs to be fixed.


It has much wildlife and vegetation within its structure which will be either gently relocated (slow worms, spiders etc) or chucked in the garden waste recycling bin (ivy, dandelions, snails, bind weed etc). This has nothing whatever to do with the previous post.

Monday, 16 May 2011

Road Closure


All will be revealed....


Tuesday, 26 April 2011

Asparagus

I can hear the clattering of people falling off chairs across the globe at the shock of seeing a new post on this blog, the first since November. If we had planted asparagus three years ago, we'd be scoffing tons of it by now, but since I only planted it a week ago, we're not allowed to eat any at all this year.

The crowns went in thus, with lots of fresh home made compost which is extra lush due to the amount of chicken poo it contains!


Although we can't eat it, seeing the first spear emerge from mother earth was a great moment. We can eat one from each plant next year (according to Paula who is pretty hot on such things), but in 2013 we'll be feasting until we smell of it. Yummy!